
Click here for English version
In diesem Beitrag zeige ich euch wie ihr die Kommunikation zwischem dem CUL und dem Schaltaktor HM_LC_SW4 mit AES verschlüsselt. Genauer gesagt handelt es sich nicht um eine Verschlüsselung, sondern um eine Signierung mit einem eindeutigen Schlüssel. Der Funkverkehr kann mitgelesen werden aber es können keine fremden Signale injiziert werden.
HomeMatic Schaltaktor Setup
Ich beziehe mich auf den Universalaktor und gehe davon aus, daß ihr diesen nachgebaut habt. Bei dem AsksinPP Code ist es wichtig, dass ihr AES aktiviert und einen AES Schlüssel beim Kompilieren hinterlegt habt. Ihr fügt in den Code von AsksinPP folgendes ein und pairt den Schaltaktor nochmals mit FHEM.
#define USE_AES
#define HM_DEF_KEY 0x01,0x02,0x03,0x04,0x05,0x06,0x07,0x08,0x09,0x0a,0x0b,0x0c,0x0d,0x0e,0x0f,0x10
#define HM_DEF_KEY_INDEX 2
Raspberry PI Server Setup
Auf den Raspberry PI Server solltet ihr die folgenden Pakete installieren.
apt-get install libcrypt-rijndael-perl
FHEM Setup
In FHEM definiert ihr dann euren geheimen Schlüssel über das unten genannte Kommando. Der Schlüssel kann unverschlüsselt eingegeben werden, er wird von FHEM prinzipiellen verschlüsselt abgelegt.
attr VCCU hmKey geheimerSchluessel
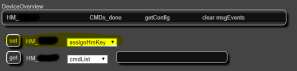
Nun können wir den Modulen den Schlüssel zuweisen. Es wird zwischen dem Gerät und den jeweiligen Schaltern unterschieden. Das Gerät ist das gesamte Device, die Schalter sind Teil des Gerätes. Den Geräten kann der Schlüssel durch das Frontend von FHEM zugewiesen weden oder per Kommandozeile. Ihr öffnet dafür das jeweilige device welches verschlüsselt kommunizieren soll.
set HM_xxxx assignHmKey
Nun öffnen wir alle vier Schalter im FHEM Frontend. Für jeden der vier Schalter setzen wir ’sign on‘ durch das Frontend. Wer die Kommandos direkt eingeben möchte setzt:
set HM_xxxx_Sw_01 sign on
set HM_xxxx_Sw_02 sign on
set HM_xxxx_Sw_03 sign on
set HM_xxxx_Sw_04 sign on

Jetzt sagen wir dem Gerät noch, dass es eine verschlüsselte Kommunikation erwarten soll.
attr HM_xxxx aesCommReq

Das gleiche machen wir mit allen vier Schaltern.
attr HM_xxxx_Sw_01 aesCommReq
attr HM_xxxx_Sw_02 aesCommReq
attr HM_xxxx_Sw_03 aesCommReq
attr HM_xxxx_Sw_04 aesCommReq

Nun müssen wir AES noch auf unseren CUL aktivieren
attr CUL_1 aesCommReq 1

Test
Um alles zu überprüfen können wir den seriellen Monitor des Arduinos öffnen. Dann lösen wir einen Schalter aus. Zwischen der Kommunikation sollten wir die Meldung ’signature ok‘ finden.

Fertig!
In this article I describe how to encrypt the communication between the CUL and the actor HM_LC_SW4 with AES. More precisely, it is not an encryption, but a signing with a unique key. The radio traffic can be read but no foreign signals can be injected.
HomeMatic Actor Setup
I refer to the universal actor and assume that you have made it. Regarding the AsksinPP code it is important that you have activated AES and inserted an AES key when compiling. You need to insert the following in the AsksinPP code and pair the actuator again with FHEM.
#define USE_AES
#define HM_DEF_KEY 0x01,0x02,0x03,0x04,0x05,0x06,0x07,0x08,0x09,0x0a,0x0b,0x0c,0x0d,0x0e,0x0f,0x10
#define HM_DEF_KEY_INDEX 2
Raspberry PI Server Setup
Please install on your Raspberry PI Server the following packages
apt-get install libcrypt-rijndael-perl
FHEM Setup
In FHEM you then define your secret key using the command below. The key can be entered unencrypted, it is stored encrypted by FHEM.
attr VCCU hmKey geheimerSchluessel
Now we can assign the key to the modules. A distinction is made between the device and the respective switches. The device is the whole device, the switches are part of the device. The key can be assigned to the devices through the frontend of FHEM or via command line. You open the respective device which should communicate encrypted.
set HM_xxxx assignHmKey
Now we open all four switches in the FHEM frontend. For each of the four switches we set ’sign on‘ through the frontend. Who wants to enter the commands directly sets:
set HM_xxxx_Sw_01 sign on
set HM_xxxx_Sw_02 sign on
set HM_xxxx_Sw_03 sign on
set HM_xxxx_Sw_04 sign on
Now we tell the device to expect encrypted communication.
attr HM_xxxx aesCommReq
We repeat the step with all the four switches:
attr HM_xxxx_Sw_01 aesCommReq
attr HM_xxxx_Sw_02 aesCommReq
attr HM_xxxx_Sw_03 aesCommReq
attr HM_xxxx_Sw_04 aesCommReq
Finally we activate AES on our Cul Stick.
attr CUL_1 aesCommReq 1
Testing
To check everything, we can open the Arduino’s serial monitor. Then we trigger a switch. Between the communication we should find the message ’signature ok‘.
Done!
