
Click here for English version
Wie richte ich FHEM auf einem Raspberry PI ein?
- Installation von Raspian Lite
- Installation von ntpdate, libjson-perl, sendEmail, libdatetime-format-strptime-perl
- Download von FHEM und Installation
- Webzugang einrichten und absichern
Motivation
Ein Raspberry Pi ist sehr energieeffizient und eignet sich für den Dauerbetrieb als SmartHome Server. Ich habe seit etlichen Jahren FHEM als Hausautomatisierung in Betrieb und möchte beschreiben, wie man FHEM in kurzer Zeit auf einem Server wie Raspberry Pi installiert um zB. HomeMatic Aktoren zu schalten. Der Vorteil eines Raspberry Pi sind die geringen Anschaffungskosten und der äußerst geringe Stromverbrauch. Alternativ läßt sich FHEM auch auf einer Fritzbox installieren.
Auswahl Raspberry Pi
Wir vergleichen zwei aktuelle Modelle und zwar den Raspberry Pi A+ und B+.
| Bezugsquelle | Raspberry Pi 3 Modell A+ | Raspberry Pi 3 Modell B+ |
| Erscheinungsdatum | 15. November 2018 | 10. März 2018 |
| SOC type | Broadcom BCM2837B0 | Broadcom BCM2837B0 |
| Core type | Cortex-A-53 64-bit | Cortex-A-53 64-bit |
| No. of cores | 4 | 4 |
| GPU | VideoCore IV | VideoCore IV |
| CPU Clock | 1.4 Ghz | 1.4 Ghz |
| RAM | 512 MB DDR2 | 1 GB DDR2 |
| USB Ports | 1x USB 2.0 | 4x USB 2.0 |
| Ethernet | Nein | Gigabit over USB 2.0 |
| HDMI | ja | ja |
| Analog Video out | ja | ja |
| Analog Audio out | ja | ja |
| SD/MMC | microSD | microSD |
| GPIO | 40-PIN | 40-PIN |
| Wifi | 2.4GHz and 5GHz 802.11 b/g/n/ac | 2.4GHz and 5GHz 802.11 b/g/n/ac |
| Bluetooth | 4.2, BLE | 4.2, BLE |
| Größe | 65mm x 56mm | 85.6mm x 56.6mm |
Ich denke, daß in besondere die Zahl der USB Ports und die Größe des RAMs die Kaufentscheidung erleichtern wird. Denkt daran, daß man für einen CUL schon einmal einen USB Port braucht. Bitte das Netzteil für Raspberry Pi 3 inkl Kabel nicht vergessen.
Installation
Ich gehe davon aus, daß ein Betriebssystem auf dem Raspberry Pi schon installiert ist. Falls nicht empfehle ich Raspian Lite, eine Debian Variante für den Raspberry Pi.
Um auf den Server besser zugreifen zu können, fixieren wir die IP Adresse des Raspberry Pis. Diese wird dem Server gewöhnlich per DHCP zugewiesen und kann im Router fest vergeben werden. Dazu geht man zB auf der Fritzbox in Heimnetzübersicht, klickt auf den Namen raspberrypi und dann auf „Details“. Bei dem Feld „Diesem Netzwerkgerät immer die gleiche IPv4-Adresse zuweisen“ setzen wir ein Häckchen. Diese IP Adresse merken wir uns, ich nehme mal an sie wäre 192.168.1.5.
Nun möchten wir remote auf den Rechner zugreifen. Unter Windows lade ich mir gerne das Tool Cygwin herunter. Wir starten mit der rechten Maustaste als Administrator und geben dann ein
ssh pi@192.168.1.5
Wir geben als passwort
raspberryein.
Mit dem Befehl
passwd
sollten wir unbedint das Passwort ändern.
Raspberry konfigurieren
Zunächst wollen wir die gesamte SD Karte nutzen. Dazu rufen wir
sudo raspi-config
auf und wählen „Advanced Options“ und „Expand Filesystem“ und verlassen das Menu mit und rebooten.
Zeitzonen können wir mit
timedatectl set-timezone Europe/Berlin
timedatectl set-ntp <span class="nb">true</span>
und Spracheinstellungen mit
sed -i -e 's/# de_DE.UTF-8 UTF-8/de_DE.UTF-8 UTF-8/' /etc/locale.gen
locale-gen
localectl set-locale LANG=de_DE.UTF-8 LANGUAGE=de_DE
setzen.
Optional: UART für Zusatzmodule
Wenn wir Aufsteckmodule wie HM-MOD-RPI-PCB verwenden, sollten wir noch folgendes einstellen:
systemctl stop serial-getty@ttyAMA0.service
systemctl disable serial-getty@ttyAMA0.service
systemctl mask serial-getty@ttyAMA0.service
Wenn wir Bluetooth verwenden setzen wir
echo "enable_uart=1" >> /boot/config.txt
echo "dtoverlay=pi3-miniuart-bt" >> /boot/config.txt
echo "core_freq=250" >> /boot/config.txt
Bitte mit
shutdown -h now
sudo rebooten.
Pakete installieren
Zunächst bringen wir den Server auf den aktuellen Stand. Dazu geben wir
sudo apt-get update && sudo apt-get -y upgrade
und danach machen wir ein reboot mit
shutdown -h now
Nun sind wir bereit die wesentlichen Pakete zu installieren
Zeitserver
sudo apt-get install ntpdate
sudo ntpdate -u de.pool.ntp.org
Perl JSON
sudo apt-get install libjson-perl
Mailversand
sudo apt-get install sendEmail
Libcrypt für AES Verschlüsselung (Homematic)
sudo apt-get install libcrypt-rijndael-perl
Perl libdatetime, erforderlich für das Weather-Modul.
sudo apt-get install libdatetime-format-strptime-perl
FHEM
Nun sind wir bereit um FHEM zu installieren. Die aktuelle Version kann man mit
sudo wget http://fhem.de/fhem-5.9.deb && sudo dpkg -i fhem-5.9.deb
installieren. Nach erfolgter Installation kann man FHEM unter http://192.168.1.5:8083 erreichen (wobei 192.168.1.5 für die IP Eures Servers steht).
Wichtig ist die Webseite mit einem Passwort abzusichern. Ich empfehle auch https zu konfigurieren, da ihr bestimmt nicht wollt, daß jemand Euch belauscht, wenn ihr mal die Seite außerhalb Eures Heimnetzes aufruft.
Wir verschlüsseln wir unser passwort mit unserem Benutzernamen. Das geht mit dem Befehl
echo -n benutzername:passwort | base64
Als Ergebis kommt so etwas wie
YmVudXR6ZXJuYW1lOnBhc3N3b3J0
heraus, welches wir mit copy in die Zwischenablage schieben. Wir öffnen in einem Browser http://192.168.1.5:8083 (bzw die IP Eures Servers) und geben in dem Eingabefeld in FHEM oben in der Mitte nacheinander (!) folgendes ein:
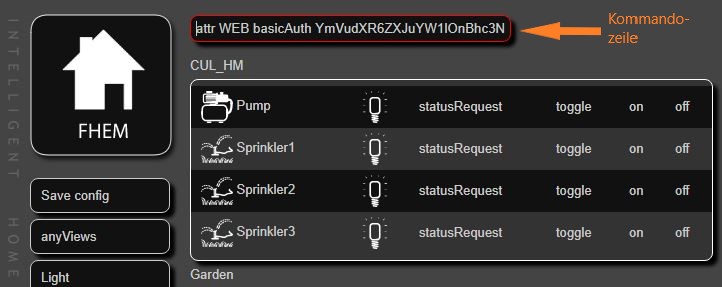
attr WEB basicAuth YmVudXR6ZXJuYW1lOnBhc3N3b3J0
attr WEBphone basicAuth YmVudXR6ZXJuYW1lOnBhc3N3b3J0
attr WEBtablet basicAuth YmVudXR6ZXJuYW1lOnBhc3N3b3J0
wobei
YmVudXR6ZXJuYW1lOnBhc3N3b3J0
für den Speicher Eurer Zwischenablage steht.
Um noch das Telnet abzusichern geben wir
attr telnetPort password hier_steht_dein_geheimes_passwort
wieder in das Feld oben ein.
Danach müssen wir noch oben links „Save config“ klicken um die Angaben dauerhaft zu speichern. Fertig!
Um unseren selbstgebauten CUL einzubinden, geben wir
define CUL1 CUL /dev/serial/by-id/usb-FTDI_FT232R_USB_UART_12345678-if00-port0@38400 1234
mit 12345678 als der ID des CUL und dem Hauscode 1234.
How do I install FHEM on a Raspberry PI?
- Installation of Raspian Lite
- Installation of ntpdate, libjson-perl, sendEmail, libdatetime-format-strptime-perl
- Download & installation of FHEM
- Setup and protection of web interface
Idea
A Raspberry Pi is very energy efficient and suitable for continuous operation as a SmartHome server. I have been using FHEM as home automation for several years and would like to describe how to install FHEM on a server like Raspberry Pi in a short time to eg pair and control HomeMatic actors. The advantages of a Raspberry Pi are the low purchase costs and the extremely low power consumption. Alternatively FHEM can also be installed on a Fritzbox.
Which Raspberry Pi?
We compare the two most recent versions Raspberry Pi A+ and B+.
| Bezugsquelle | Raspberry Pi 3 Modell A+ | Raspberry Pi 3 Modell B+ |
| Release date | 15. November 2018 | 10. March 2018 |
| SOC type | Broadcom BCM2837B0 | Broadcom BCM2837B0 |
| Core type | Cortex-A-53 64-bit | Cortex-A-53 64-bit |
| No. of cores | 4 | 4 |
| GPU | VideoCore IV | VideoCore IV |
| CPU Clock | 1.4 Ghz | 1.4 Ghz |
| RAM | 512 MB DDR2 | 1 GB DDR2 |
| USB Ports | 1x USB 2.0 | 4x USB 2.0 |
| Ethernet | Nein | Gigabit over USB 2.0 |
| HDMI | yes | yes |
| Analog Video out | yes | yes |
| Analog Audio out | yes | yes |
| SD/MMC | microSD | microSD |
| GPIO | 40-PIN | 40-PIN |
| Wifi | 2.4GHz and 5GHz 802.11 b/g/n/ac | 2.4GHz and 5GHz 802.11 b/g/n/ac |
| Bluetooth | 4.2, BLE | 4.2, BLE |
| Size | 65mm x 56mm | 85.6mm x 56.6mm |
I think that in particular the number of USB ports and the size of the RAM will facilitate the purchase decision. Remember that you need a USB port for a CUL. Please don’t forget the power supply for Raspberry Pi 3 incl. cable.
Installation
I assume that an operating system is already installed on the Raspberry Pi. If not, I recommend Raspian Lite, a Debian derivative for the Raspberry Pi.
To get better access to the server, we fix the IP address of the Raspberry Pi. This is usually assigned to the server via DHCP and can be fixed in the router. To do this, go e.g. to the Fritzbox in Home Network Overview, click on the name raspberrypi and then on „details“. We check the box „Always assign the same IPv4 address to this network device“. We remember this IP address, I assume it would be 192.168.1.5.
Now we want to access the computer remotely. Under Windows I recommend to download the tool Cygwin. We start with the right mouse button as administrator and then enter
ssh pi@192.168.1.5
As password we enter
raspberryUsing the command
passwd
we change our password to something unique.
Configuration of the Raspberry PI
First we’d like to make use of the complete SD card. We start the program
sudo raspi-config
and select „Advanced Options“ and „Expand Filesystem“ and we leave the menu and exit with a reboot.
Timezone can be set with
timedatectl set-timezone Europe/Berlin
timedatectl set-ntp <span class="nb">true</span>
and language settings with
sed -i -e 's/# de_DE.UTF-8 UTF-8/de_DE.UTF-8 UTF-8/' /etc/locale.gen
locale-gen
localectl set-locale LANG=de_DE.UTF-8 LANGUAGE=de_DE
changed to your prefered language.
Optional: UART for add on modules
When using add on modules like HM-MOD-RPI-PCB we should set the following parameters
systemctl stop serial-getty@ttyAMA0.service
systemctl disable serial-getty@ttyAMA0.service
systemctl mask serial-getty@ttyAMA0.service
And if we use bluetooth we should enter
echo "enable_uart=1" >> /boot/config.txt
echo "dtoverlay=pi3-miniuart-bt" >> /boot/config.txt
echo "core_freq=250" >> /boot/config.txt
Please don’t forget to reboot
shutdown -h now
and restart.
Installation of used packages
At first we update our server. We enter
sudo apt-get update && sudo apt-get -y upgrade
and reboot again with
shutdown -h now
Now we are ready to install the most essential packages
Time Server
sudo apt-get install ntpdate
sudo ntpdate -u de.pool.ntp.org
Perl JSON
sudo apt-get install libjson-perl
Sending mails
sudo apt-get install sendEmail
Libcrypt for AES encryption (Homematic)
sudo apt-get install libcrypt-rijndael-perl
Perl libdatetime, used by the Weather-Module.
sudo apt-get install libdatetime-format-strptime-perl
FHEM
Finally we are ready to install FHEM. The most recent version can be installed with the command
sudo wget http://fhem.de/fhem-5.9.deb && sudo dpkg -i fhem-5.9.deb
After the installation you can reach FHEM at http://192.168.1.5:8083 (where 192.168.1.5 stands for the IP of your server).
It is important to protect the website with a password. I also recommend to configure https, because you don’t want anyone to overhear you when you visit the site outside your home network.
We encrypt our password with our username. This works with the command
echo -n benutzername:passwort | base64
As result we get
YmVudXR6ZXJuYW1lOnBhc3N3b3J0
which we copy to the clipboard. We open in a browser http://192.168.1.5:8083 (or the IP of your server) and enter the following commands in the input field in FHEM in the top middle box one after the other:
attr WEB basicAuth YmVudXR6ZXJuYW1lOnBhc3N3b3J0
attr WEBphone basicAuth YmVudXR6ZXJuYW1lOnBhc3N3b3J0
attr WEBtablet basicAuth YmVudXR6ZXJuYW1lOnBhc3N3b3J0
where
YmVudXR6ZXJuYW1lOnBhc3N3b3J0
is a placeholder for the memory of your clipboard.
To secure the telnet we enter
attr telnetPort password hier_steht_dein_geheimes_passwort
in the field in the top middle in FHEM.
Then we have to click „Save config“ in the upper left corner to save the configuration data permanently. Done!
To setup our self made CUL we use the command
define CUL1 CUL /dev/serial/by-id/usb-FTDI_FT232R_USB_UART_12345678-if00-port0@38400 1234
with 12345678 as the ID of CUL and the housecode 1234.

2 Antworten zu „Raspberry als FHEM Server einrichten“
[…] habe ich den Raspberry Pi Home Server aufgesetzt sowie mein 433Mhz CUL angeschlossen. Den CUL habe ich mit dem […]
[…] diesem Blog möchte ich Euch zeigen, wie Ihr einen Telegram Bot (Chatbot) mit dem Raspberry SmartHome (FHEM) einrichtet. In einem zweiten Schritt kann man sogar über Google Home Mini mit FHEM […]