
Click here for English version
In diesem kleinen Handbuch zeige ich wie wir unseren Hexacopter mit dem Flightcontroller Naze32 und Cleanflight konfigurieren. Alternativ könnt ihr Euch das folgende Video ansehen.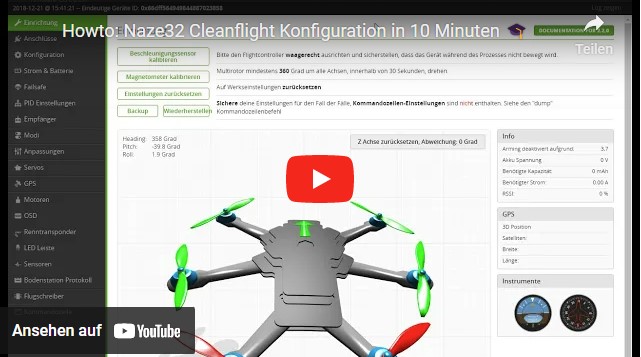
Cleanflight Einrichtung
Zunächst werden wir den Beschleunigungssensor und den Magnetometer kalibrieren.
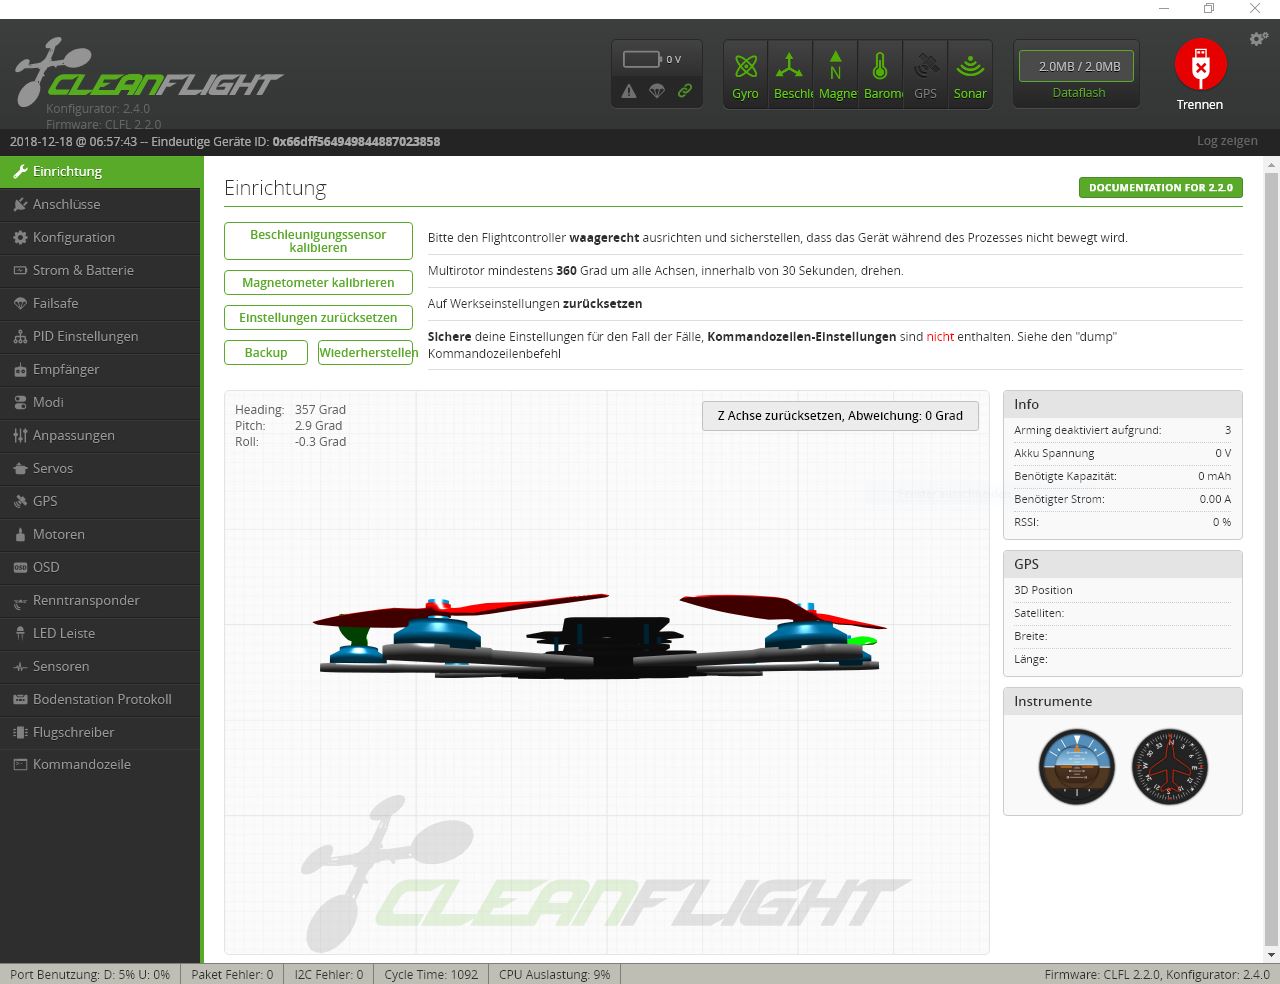
Beschleunigungssensor kalibrieren
Mit dem Button „Beschleunigungssensor kalibrieren“ justieren wir den Beschleunigungssensor.
Es ist sehr wichtig, daß der Hexacopter auf einer ebenen Fläche völlig waagerecht steht und er sich während dem Vorgang nicht bewegt.
Wenn alles waagerecht ist, drücken wir „Beschleunigungssensor kalibrieren“ und wartet so lange, bis der Vorgang abgeschlossen ist.
Magnetometer kalibrieren
Nun können wir den Magnetometer kalibrieren. Dazu benötigt ihr ein ausreichend langes USB Kabel, damit ihr während des Vorgangs den Kopter um alle Achsen drehen könnt. Ihr drückt dann auf „Magnetometer kalibrieren“ und bewegt den Hexacopter um alle drei Achsen. Diese drei Achsen nennen sich Roll, Pitch und Yaw.
Roll: Ist die Achse mit der man bei einem klassischen Flieger den linken oder rechten Flügel senkt.
Pitch: Ist die Achse mit der man bei einem Flugzeug einen Looping fliegen würde.
Yaw: Ist eine Drehung von oben gesehen in oder gegen den Uhrzeigersinn.
Dreht um alle diese Achsen um 360° innerhalb von 30 Sekunden.
Anschlüsse
Wir setzen UART1 auf MSP 115200 und lassen die anderen Funktionen deaktiviert. Bei UART2 setzen wir den Seriellen Empfänger auf on.

Konfiguration
In diesem Tab könnt ihr die Basiskonfiguration vornehmen.
Mischer
In diesem Feld könnt ihr angeben, was für ein Modell ihr fliegt. Wir wählen den Hexacopter aus und sehen auch sofort die Laufrichtung und Nummerierung der Motoren.
Board und Sensorausrichtung
Hier könnt ihr angeben, wie Eure Naze32 mit dem Board verbaut ist. Dreht und schwenkt Euren Kopter, dann könnt ihr sehen, ob ihr etwas ändern müsst. Wenn der Kopter sich auf dem Monitor nicht in die Richtung bewegt, wie ihr ihn bewegt, dann müsst ihr die Einstellungen anpassen. Ich musste zB Yaw um 180° drehen. Sind Eure Einstellungen hier falsch, hat das fatale Folgen. Der Kopter steuert dadurch die falschen Motoren an, da er nicht weiß, wie die Naze32 verbaut ist.
Empfänger
Hier könnt ihr die Naze32 für den Receiver der FlySky FSi6 einstellen. Ich nutze einen „serial based receiver“ und IBUS. Dadurch benötige ich nur ein Kabel vom Receiver der FlySky FSi6 zur Naze32 und kann zwei weitere Ausgänge direkt für das Gimbal nutzen.
System Konfiguration
Bei der System Konfiguration müsst ihr noch auswählen, welche Features die Naze32 hat. Es gibt unterschiedliche Versionen der Naze32, aber meine hat Accelerometer, Barometer und Magnetometer.
ESC/Motor Funktionen
Abhängig von den ESCs PWM auswählen, ansonsten versteht sich die Naze32 nicht mit den ESCs und die Motoren laufen nicht. Daneben wähe ich 1070 als „Minimum when armed“ aus. So drehen sich die Motoren ein wenig, wenn ich den Modus „armed“ wähle.
Andere Funktionen
Ich habe mir noch ein kleines Sonar verbaut, welches ich mit bei anderen Funktionen aktiviere.


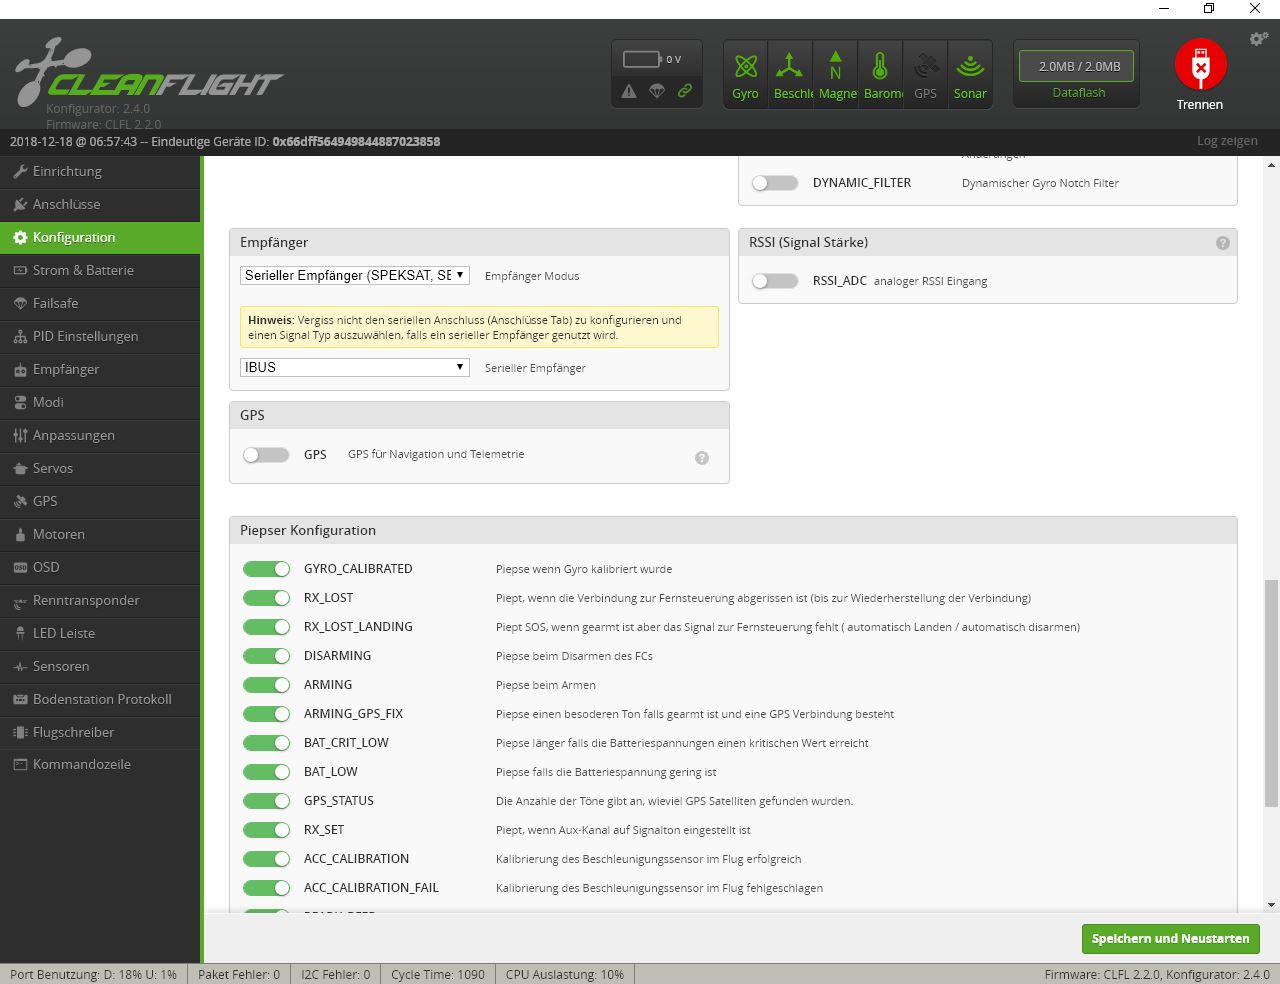
Failsafe
Mit Failsafe kann man einstellen, wie sich der Kopter verhalten soll, wenn die Verbindung zur Fernsteuerung abbricht. Wir wählen eine Umdrehung für die Rotoren von 1250, so daß der Kopter sinkt (wenn man zu viel wählt, steigt der Kopter so lange bis die Batterien leer sind!). Nach 20 Sekunden schalten wir die Motoren ab. Es gibt Piloten, die einfach die Motoren sofort abschalten lassen mit der Überlegung, daß ein Kopter am Boden mit laufenden Rotoren Schaden anrichten kann. Allerdings richtet ein herunterfallender Kopter auch Schaden an.

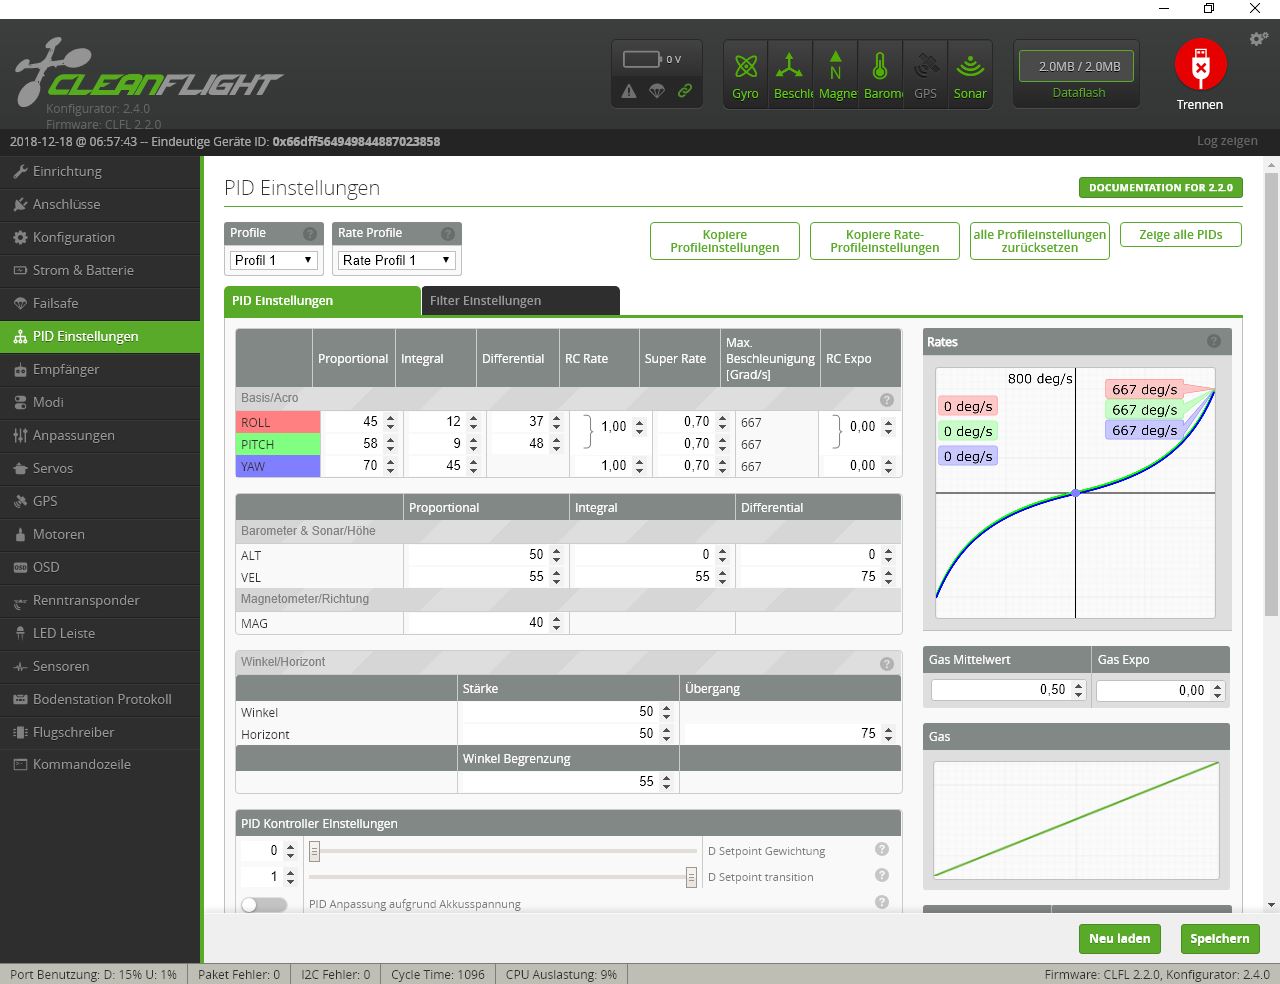
PID Tuning
Für den ersten Flug könnt ihr die PID Werte unverändert lassen. PID Werte sind sehr wichtig, wenn der Kopter unerwünschte Flugeigenschaften hat. Mein Hexacopter hat leichte Schwingbewegungen beim Sinkflug gemacht. Diese konnte ich mit dem PID Tuning abstellen. Bevor ihr die PID Werte tunt, balanciert unbedingt Eure Propeller. Außerdem empfehle ich Euch das Blackbox Feature zu aktivieren und den Cleanflight Blackbox Explorer (Chrome Extension) zu nutzen.
Mit den PID Werten wird bestimmt, wie sich der Hexacopter verhält, wenn der Istzustand vom Sollzustand abweicht. Im Allgemeinen stellt man zunächst den P-Wert ein, dann den D-Wert und zuletzt den I-Wert.
P-Wert
Der P-Wert (proportional) gibt an, wie stark der Kopter auf einer absoluten Abeichung zum Sollwert reagiert.
I-Wert
Der I-Wert (integral) gibt an, wie der Kopter bei länger anhaltenden Abweichungen zum Sollwert reagiert. Wenn sich zum Beispiel Abweichungen langsam aufbauen oder der P-Wert nicht stark genug ist.
D-Wert
Der D-Wert (derivative) hilft nicht über das Ziel hinauszuschießen und mindert die Stärke der Korrektur. Es wird die Ableitung Zwischen Soll- und Istwert gemessen. Sollte mit zu hoher Geschwindigkeit der Kopter den Sollwert erreichen, wird schon vorher die Korrekturgeschwindigkeit gemindert. Ansonsten würde der Kopter den Sollwert immer wieder verfehlen und der Kopter könnte sich aufschaukeln.
PID Filter Settings
Spätestens bei den Filter Settings benötigt ihr den Cleanflight Blackbox Explorer (Chrome Extension). Hier könnt ihr unerwünschte Messungen, die zB durch Vibrationen entstehen korrigieren. Diese Messungen spiegeln sich in der Motorsteuerung wieder, wodurch die Motoren Fehlsignale erhalten. Um dies zu korrigieren loggt ihr den Flug, wertet die Blackbox aus und untersucht die Messungen. Die richtigen Einstellungen zu finden hat meinen Hexacopter noch stabiler gemacht und sind für ruhige Aufnahmen der Kamera und die Einstellung des Gimbals notwendig.

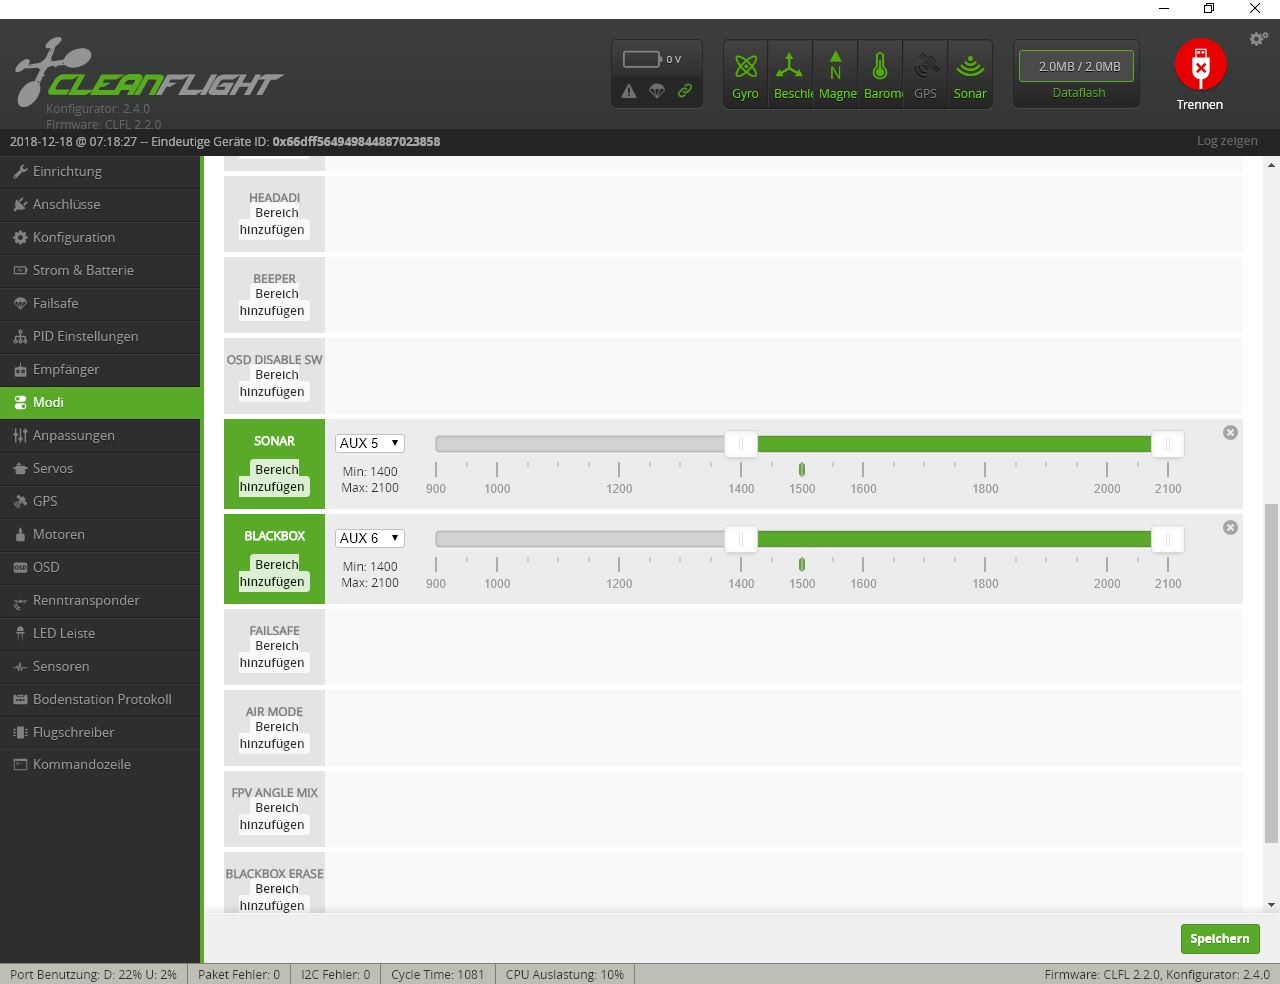
Modi / Modes
Mit diesem Tab verbindest Du die Flugmodi mit den Schalterstellungen an der FlySky FSi6.
Ich habe mich für die folgende Konfiguration entschieden:
Aux 4: arm, unarm: dieser Schalter der Flysky hat bei mir nur zwei Stellungen, also eignet er sich bestens.
Aux 3: Angle, Horizon oder Acro Modus, da der Schalter der Flysky drei Stellungen hat. Der Angle Modus balanciert den Kopter automatisch aus. Im Horizon Modus kommen noch flips dazu. Im Acro Modus musst Du selbst ausbalancieren und ist für Anfänger nicht geeignet.
Aux 5: Baro Modus und Sonar. In diesem Modus hält der Kopter seine Höhe mit Hilfe des Barometers. Solltet ihr kein Sonar haben, einfach abwählen.
Aux 6: Magnetometer und Blackbox. Auf den Magnetometer kann ich manchmal verzichten, zB wenn ich die Blackbox nach einiger Zeit erst anschalten will. Und da ich keinen weiteren Kanal zur Verfügung habe, lege ich sie zusammen. Der Magnetometer hält die Richtung des Kopters in der Yaw Achse konstant.
Beachtet auch die Schieberegler mit den Bereichen, in denen der jeweilige Modus aktiv ist.
Zu erwähnen bleibt der Modus heads free. In diesem Modus ist vorwärts, rückwärts, links, rechts einmalig kalibriert und mit head adjustment fixiert. So kann man den Kopter um Yaw drehen, aber es drehen sich die Flugrichtungen nicht mit. Theoretisch toll, ich habe die praktische Erfahrung gemacht, daß das Magnetometer einwandfrei funktionieren muss und sich nicht durch die Motoren (magnetisch) irritieren lassen darf, sonst driftet die Richtung.

Tab: Motors
Bitte vor Nutzung der Funktion die Propeller abnehmen. Man kann die Motoren testen ob sie funktionieren und richtig verkabelt sind sowie die ESCs kalibrieren.
Dazu trennt man den Akku von dem Kopter. Die Naze32 schliesst man per USB an. Dann schiebt man einen einzelnen Motorregler voll nach oben und schließt den Akku an. Der ESC piepst und man nimmt den Regler komplett auf Null. So kalibriert man jedes einzelne ESC.

Bodenstation Protokoll / Logging
In diesem Tab könnt ihr angeben, was ihr alles geloggt haben möchtet. Die geloggten Daten könnt ihr mit dem Cleanflight Blackbox Explorer auswerten.

Flugschreiber
Die Naze32 hat einen kleinen internen Speicher für das Logging von Daten. Solltet ihr einen externen Speicher haben, kann man es hier konfigurieren. Denkt auch daran, die Daten vor einem Flug zu löschen, ansonsten ist der Speicher voll und ihr habt nur die alten Daten.

English Version
In this little manual I show you how to configure our Hexacopter with the Flightcontroller Naze32 and Cleanflight. Alternatively you can watch the following video.
Cleanflight setup
First we will calibrate the acceleration sensor and the magnetometer.
Calibrating the accelerometer
With the button „Calibrate acceleration sensor“ we adjust the acceleration sensor.
It is very important that the hexacopter is completely horizontal on a flat surface and does not move during the process.
When everything is horizontal, we press „Calibrate Accelerometer“ and wait until the process is complete.
Calibrating the magnetometer
Now we can calibrate the magnetometer. For this you need a long USB cable, so that you can turn the copter around all axes during the process. Then press „Calibrate Magnetometer“ and move the hexacopter around all three axes. These three axes are called Roll, Pitch and Yaw.
Roll: This is the axis used to lower the left or right wing of a classic plane.
Pitch: Is the axis with which you would fly a loop in an airplane.
Yaw: Is a rotation seen from above in clockwise or anti-clockwise direction.
Turns around all these axes 360° within 30 seconds.
Connections
We set UART1 to MSP 115200 and leave the other functions disabled. With UART2 we set the serial receiver to on.
Configuration
In this tab you can make the basic configuration.
Mixer
In this field you can enter the type of model you are flying. We select the hexacopter and immediately see the direction and numbering of the engines.
Board and sensor alignment
Here you can specify how your Naze32 is installed with the board. Turn and swivel your copter to see if you need to change anything. If the copter does not move on the monitor in the direction you move it, you will need to adjust the settings. For example, I had to rotate Yaw 180°. If your settings here are wrong, it has fatal consequences. The copter is controlling the wrong motors because it doesn’t know how the Naze32 is installed.
Receiver
Here you can set the Naze32 for the receiver of the FlySky FSi6. I use a serial based receiver and IBUS. So I only need one cable from the receiver of the FlySky FSi6 to the Naze32 and can use two more outputs directly for the gimbal.
System Configuration
During the system configuration you have to choose which features the Naze32 has. There are different versions of the Naze32, but mine has accelerometer, barometer and magnetometer.
ESC/Motor Functions
Depending on the ESCs select PWM, otherwise the Naze32 does not get along with the ESCs and the motors do not run. Besides I would consider 1070 as „Minimum when armed“. So the motors rotate a little when I choose the mode „armed“.
Other functions
I have built in a small sonar, which I activate with other functions.
Failsafe
With Failsafe you can set how the copter should behave if the connection to the remote control is lost. We select a rotation for the rotors of 1250, so that the copter sinks (if you select too much, the copter rises until the batteries are empty!). After 20 seconds we switch off the motors. There are pilots who simply switch off the motors immediately with the consideration that a copter on the ground with running rotors can cause damage. However, a falling copter also causes damage.
PID Tuning
For the first flight you can leave the PID values unchanged. PID values are very important if the copter has unwanted flight characteristics. My hexacopter made slight swinging movements when descending. I was able to turn them off with the PID Tuning. Before you tune the PID values, balance your propellers. I also recommend to activate the Blackbox feature and use the Cleanflight Blackbox Explorer (Chrome Extension).
The PID values determine how the hexacopter behaves when the actual state deviates from the target state. In general you first set the P-value, then the D-value and finally the I-value.
P-value
The P-value (proportional) indicates how strongly the copter reacts to an absolute deviation from the setpoint.
I-value
The I-value (integral) indicates how the copter reacts in case of longer lasting deviations from the setpoint. If, for example, deviations build up slowly or the P-value is not strong enough.
D-value
The D-value (derivative) does not help to overshoot the target and reduces the strength of the correction. The derivative is measured between the target value and the actual value. If the copter reaches the target value at too high a speed, the correction speed is reduced beforehand. Otherwise the copter would always miss the target value and the copter could swing up.
PID Filter Settings
At the latest you need the Cleanflight Blackbox Explorer (Chrome Extension) for the filter settings. Here you can correct unwanted measurements, e.g. caused by vibrations. These measurements are reflected in the engine control, whereby the engines receive false signals. To correct this you log the flight, evaluate the black box and examine the measurements. Finding the right settings has made my Hexacopter even more stable and is necessary for quiet shots of the camera and the adjustment of the gimbal.
Modes / Modes
With this tab you connect the flight modes with the switch positions on the FlySky FSi6.
I decided for the following configuration:
Aux 4: poor, unarmed: this switch on the FlySky has only two positions, so it’s perfect.
Aux 3: Angle, Horizon or Acro mode, because the Flysky switch has three positions. The Angle mode balances the copter automatically. In Horizon mode flips are added. In Acro mode you have to balance yourself and is not suitable for beginners.
Aux 5: Baro mode and sonar. In this mode the copter holds its height with the help of the barometer. If you don’t have a sonar, just deselect.
Aux 6: Magnetometer and Blackbox. Sometimes I can do without the magnetometer, e.g. if I want to switch on the black box after some time. And since I don’t have another channel available, I combine it. The magnetometer keeps the direction of the copter constant in the Yaw axis.
Also note the sliders with the areas where the respective mode is active.
The mode heads free has to be mentioned. In this mode forward, backward, left, right are calibrated once and fixed with head adjustment. So you can rotate the copter around Yaw, but the flight directions do not rotate with it. Theoretically great, I made the practical experience that the magnetometer must function perfectly and must not be irritated by the motors (magnetic), otherwise the direction drifts.
Tab: Motor
Please remove the propellers before using this function. You can test the motors if they work, if they are wired correctly and you can calibrate the ESCs.
To do this, disconnect the battery from the copter. The Naze32 is connected via USB. Then you push a single motor controller fully up and connect the battery. The ESC beeps and you take the controller completely to zero. This is how you calibrate every single ESC.
Ground station protocol / logging
In this tab you can specify what you want to have logged. You can evaluate the logged data with the Cleanflight Blackbox Explorer.
Flight recorder
The Naze32 has a small internal memory for logging data. If you have an external memory, you can configure it here. Also remember to delete the data before a flight, otherwise the memory is full and you only have the old data.
