
Click here for English version
Aktuelles Video / latest video
Wie baue ich eine Drohne?
- Material wie Rahmen, Motoren, Flugcontroller, Fernsteuerung bestellen
- Rahmen mit ESCs verlöten und Arme montieren
- Motoren, Flugcontroller, Empfänger anbringen
- Alles verlöten und verbinden
- Flugcontroller einstellen und ESCs kalibrieren
- Gimbal kalibrieren
Meine Erfahrung
Vor einigen Monaten habe ich einen äußerst leistungsfähigen Hexacopter selbst gebaut. In dieser Anleitung möchte ich meine Erfahrung weitergeben. Im Prinzip kann jeder mit ein wenig Bastel- und Löterfahrung dieses Projekt realisieren.
Dabei habe ich einen DJI S550 Frame (alternativ DJI F550), Naze32, FlySky FSi 6 Fernsteuerung und 1000 KV Motoren verwendet. Mittels einer Kamera wie SJ7 Star und einem Sender kann ich ein Live Bild übertragen. Gesamtkosten (ohne Kamera) sind ca. 200 EUR, Gewicht mit Kamera und Gimbal excl. Akku liegt bei 1484g.
Soll ich einen Quadcopter, Hexacopter oder Racer bauen?
Ein Racer ist eher zum Spaß, wobei Quadcopter und Hexacopter sich sehr gut zum Filmen eignen. Ein Hexacopter hat bessere und ruhigere Flugeigenschaften als ein Quadcopter. Es hängt also davon ab, was ich mit der Drohne vorhabe.
Materialliste
S550 Hexacopter Frame
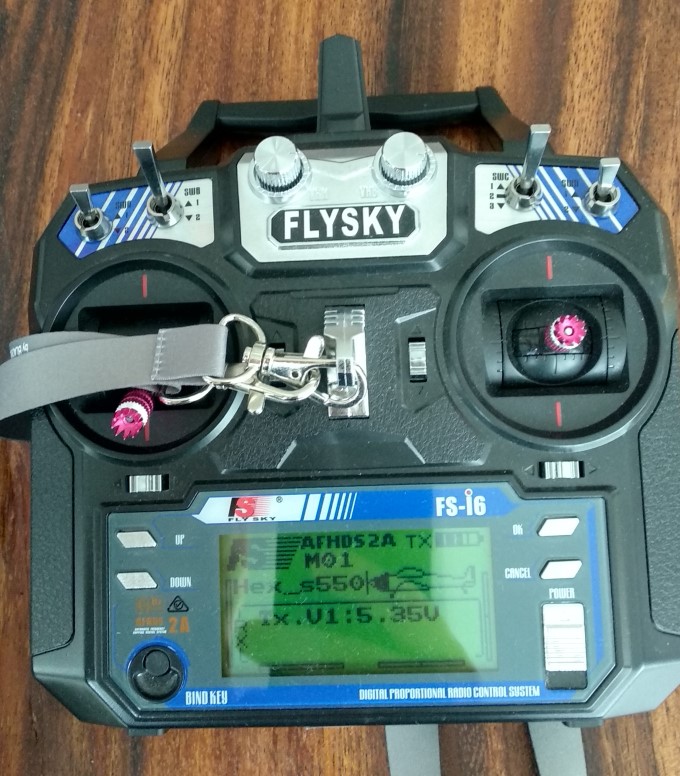
FlySky FSi6 Fernsteuerung
Naze32 Flight Controller
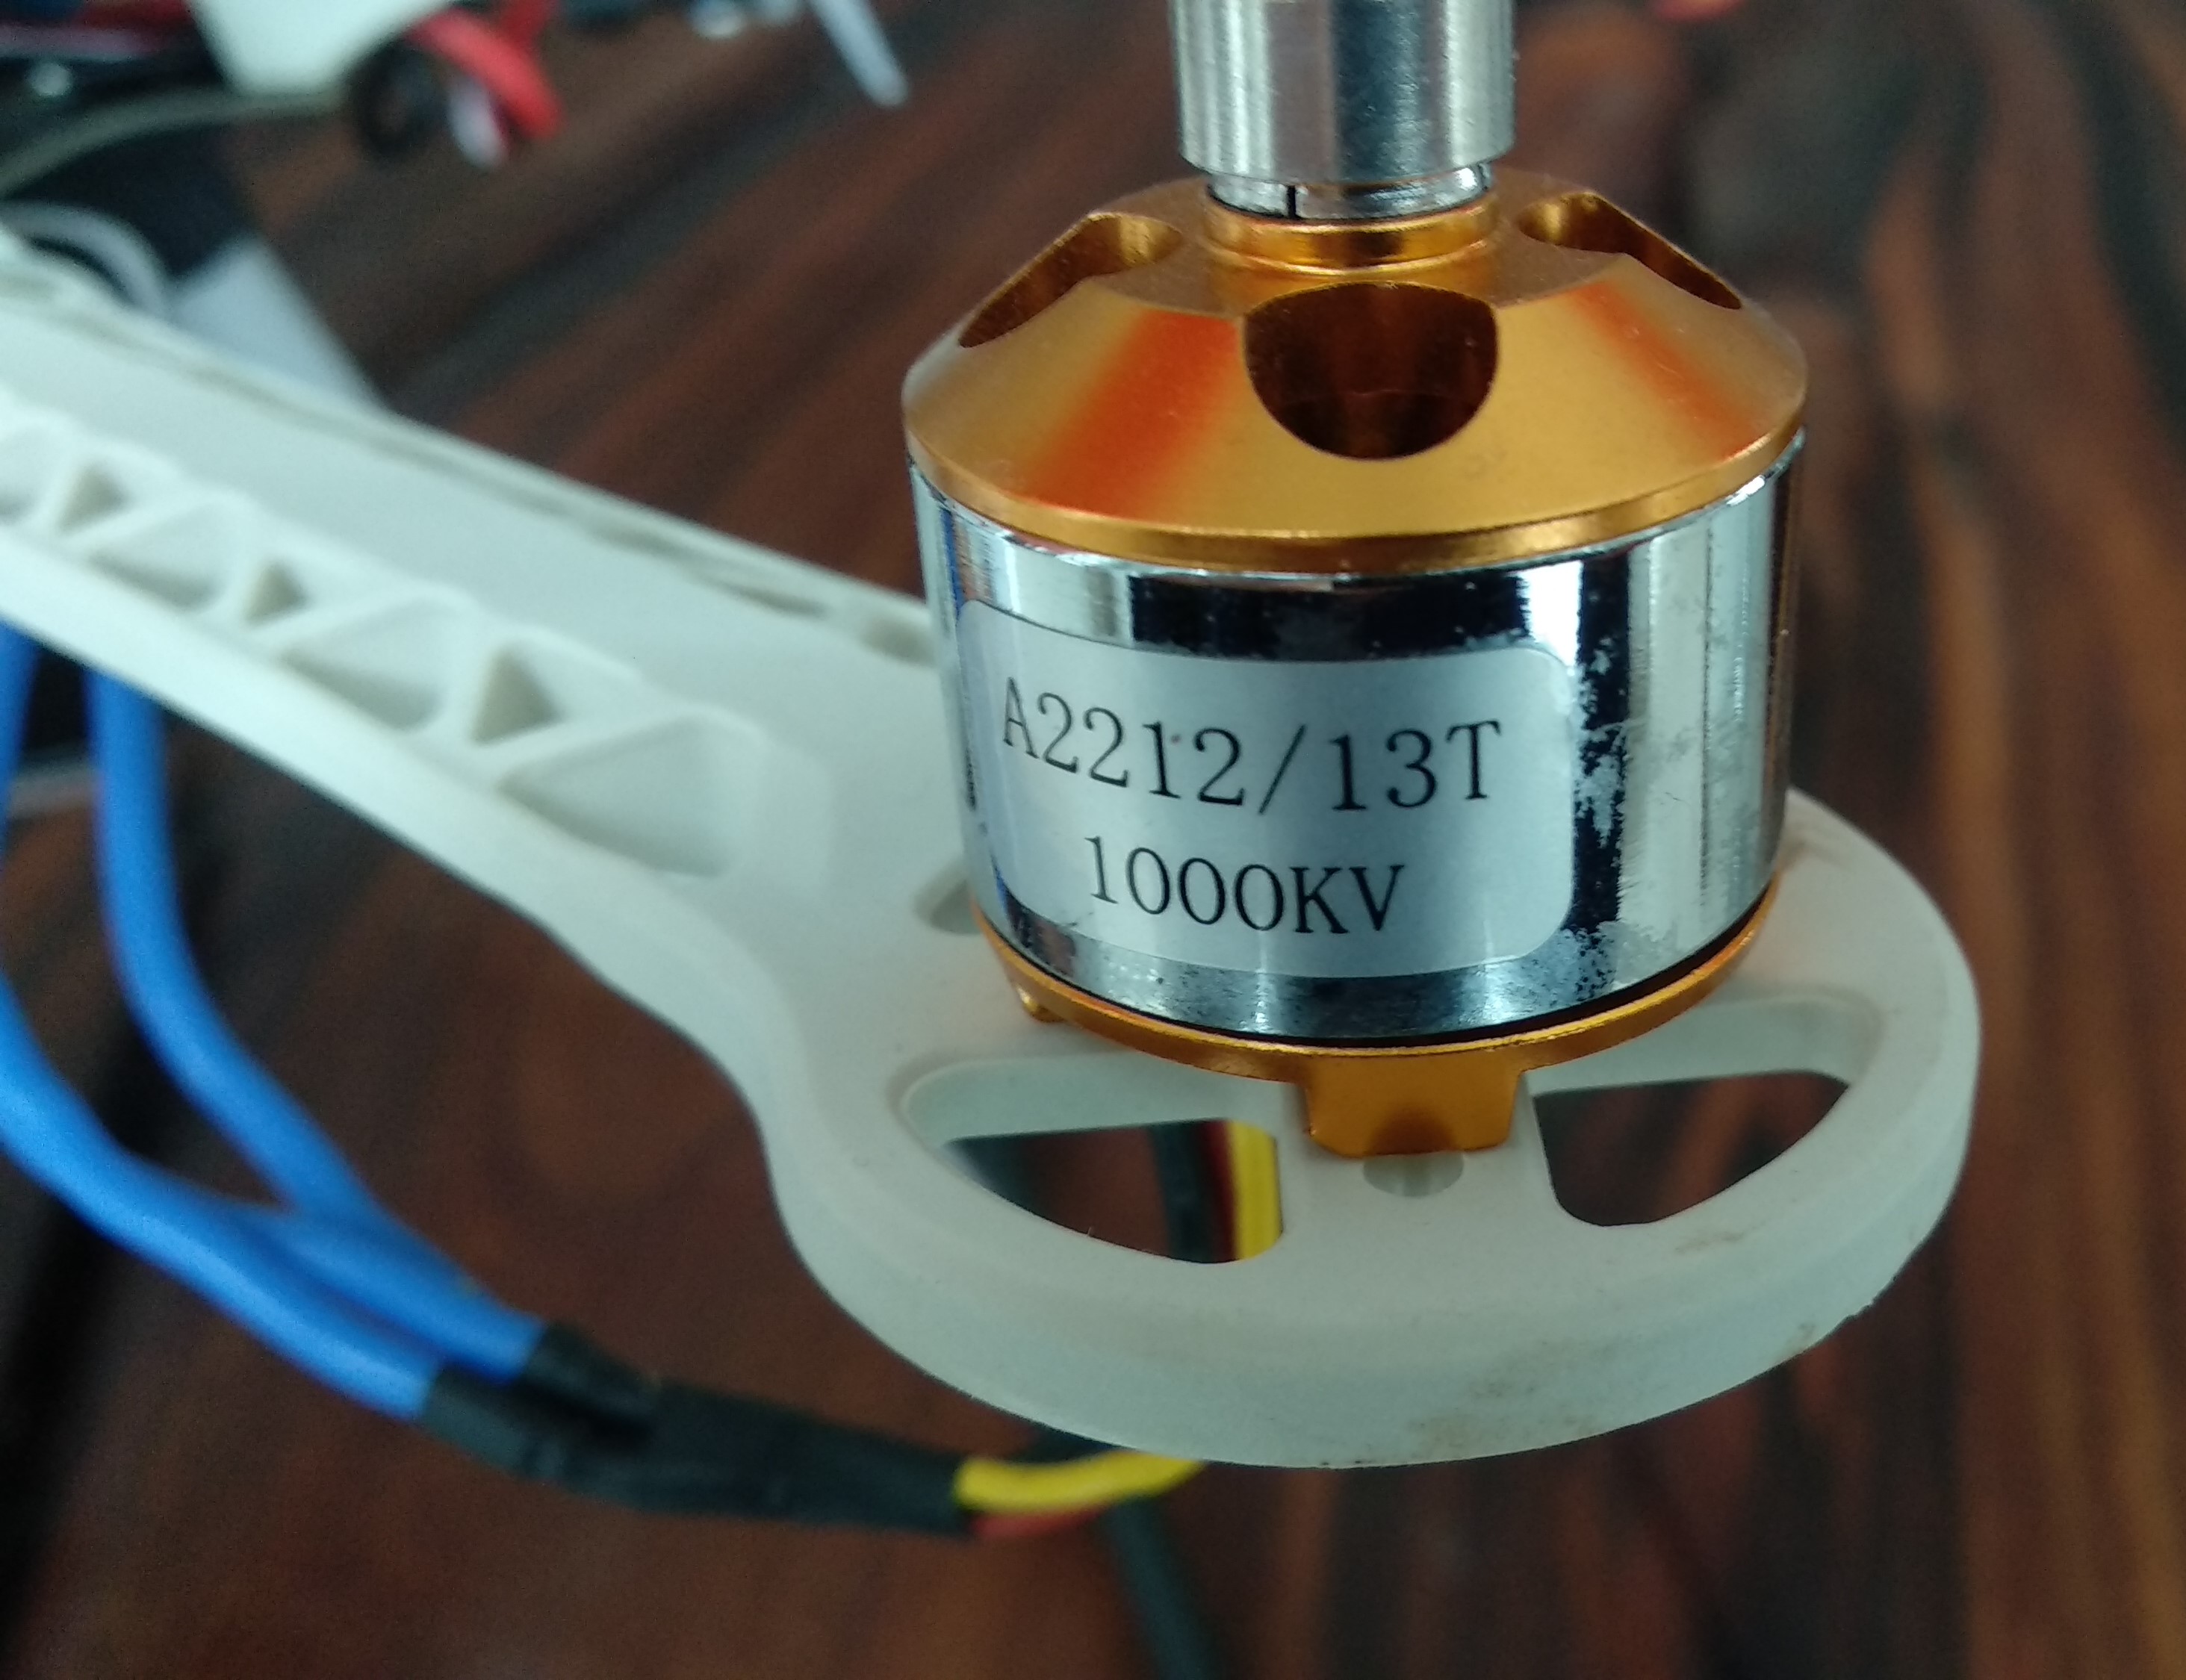
6x 1000 KV Motor
6x 30A ESC Simonk
XT60 Stecker
Silikon Kabel 14 AWG
LiPo Akku 2200mAh 3S
1045 Propeller
iMax B6 Ladegerät
LiPo Checker
Gimbal (optional)
Eachine 25 mW FPV Video Sender (optional)
Eachine Video Empfänger (optional)
Aufbau des Rahmens
Ich habe mir einen DJI S550 gekauft. Alternativ kann man sich auch einen DJI F550 kaufen, der sich im Landegestell zu letzterem unterscheidet. Ansonsten ist der Rahmen sehr stabil und überlebt auch einen Crash, ggfs bricht das Landegestell oder auch mal ein Arm.


ESCs und Motoren verlöten
Die Motoren werden durch sogenannte ESCs (electronic speed control) gesteuert, die mit dem flight controller kommunizieren. Sie können auch die Umdrehungsgeschwindigkeit des Motors messen und so den Sollwert des flight controllers mit dem Istwert vergleichen und Anpassungen durchführen.
Man verlötet am besten erst die ESCs mit der Hauptplatine und verschraubt dann die Arme an der Hauptplatine. Danach werden die Motoren an den Armen befestigt und Schrumpfschlauch auf die Verbindungen zum Motor angebracht. Die ESCs haben drei Verbindungen zum Motor, ein Steuersignal und Plus und Minus. Um zu wissen, wie angeschlossen wird, kann man in clean flight kann der entsprechenden Hexacopter ausgewählt werden. Es erscheint eine kleine Skizze mit den Laufrichtungen der Motoren. Zwei benachbarte Motoren haben jeweils gegensätzliche Laufrichtung.
Um herauszufinden, welche Laufrichtung der Motor hat, kann man ein ESC direkt an den Empfänger anschliessen und mal austesten in welche Richtung der Motor dreht. Die Drehrichtung und Verdrahtung merkt man sich. So weiß man welche Drehrichtung zu welcher Verdrahtung passt. Will man die Drehrichtung umkehren, vertauscht man einfach Plus und Minus.
Flight Controller und Firmware
Der Flight controller berechnet aus der aktuellen Lage und den Befehlen des Empfängers die Motorsteuerung. Ich habe mich für einen Naze32 flight controller entschieden, der first person view (FPV), eine Blackbox, GPS, LEDs und weitere Features unterstützt. Auf diesen flight controller können verschiedene Firmwares geflasht werden. Bei mir fiel die Wahl auf Cleanflight, wobei ich mir auf Linux nur diejenigen Features compiliert habe, die ich auch brauche.
Cleanflight gibt es als Addon für den Chrome Browser, mit dem auch die Firmware auf den Naze32 geflasht werden kann. Zunächst muss man aber noch einen Treiber installieren. Danach einfach das Addon Cleanflight im Chrome Browser auswählen und die dementsprechende Firmware downloaden. Je nach Version der Firmware kommen Features hinzu oder fallen auch einmal weg. Wenn man sich eine custom Version kompilieren möchte, dann kann man sich unter github cleanflight downloaden und die dementsprechenden Features auskommentieren oder mitkompilieren. In einem weiteren Beitrag findet ihr eine ausführliche Anleitung zur Konfiguration der Naze32 mit Cleanflight.

Verkabelte Naze32 im Frame
Einstellung der ESCs
Jetzt kann man die ESCs kalibirieren. In clean flight kann man jeden ESC einzeln kalibrieren. Man geht auf den Tab Motor und wählt das ESC bzw den Motor aus. Der Motor wird auf das Maximum in cleanflight gestellt (ohne Rotor) und danach der ESC angeschlossen. Wenn das ESC piept dann wird der Regler auf Null genommen. Danach kann die Stromversorgung des ESCs weggenommen werden und mit dem nächsten Motor genauso verfahren werden.

FlySky FSi 6 Fernsteuerung
Ich verwende für die Übertragung des Signals PPM. Das reduziert die Zahl der Kabel zwischen Empfänger und flight controller auf drei (V+, GND, PPM) und läßt mir die Freiheit, das Gimbal an die Fernsteuerung anzuschliessen. Der Empfänger muss mit der Fernsteuerung über die Connect Taste gekoppelt werden. Man kann auf die Fernsteuerung eine andere Firmware aufspielen, dann hat sie ein paar Funktionen mehr. Wer daran Interesse hat, Mail an mich.
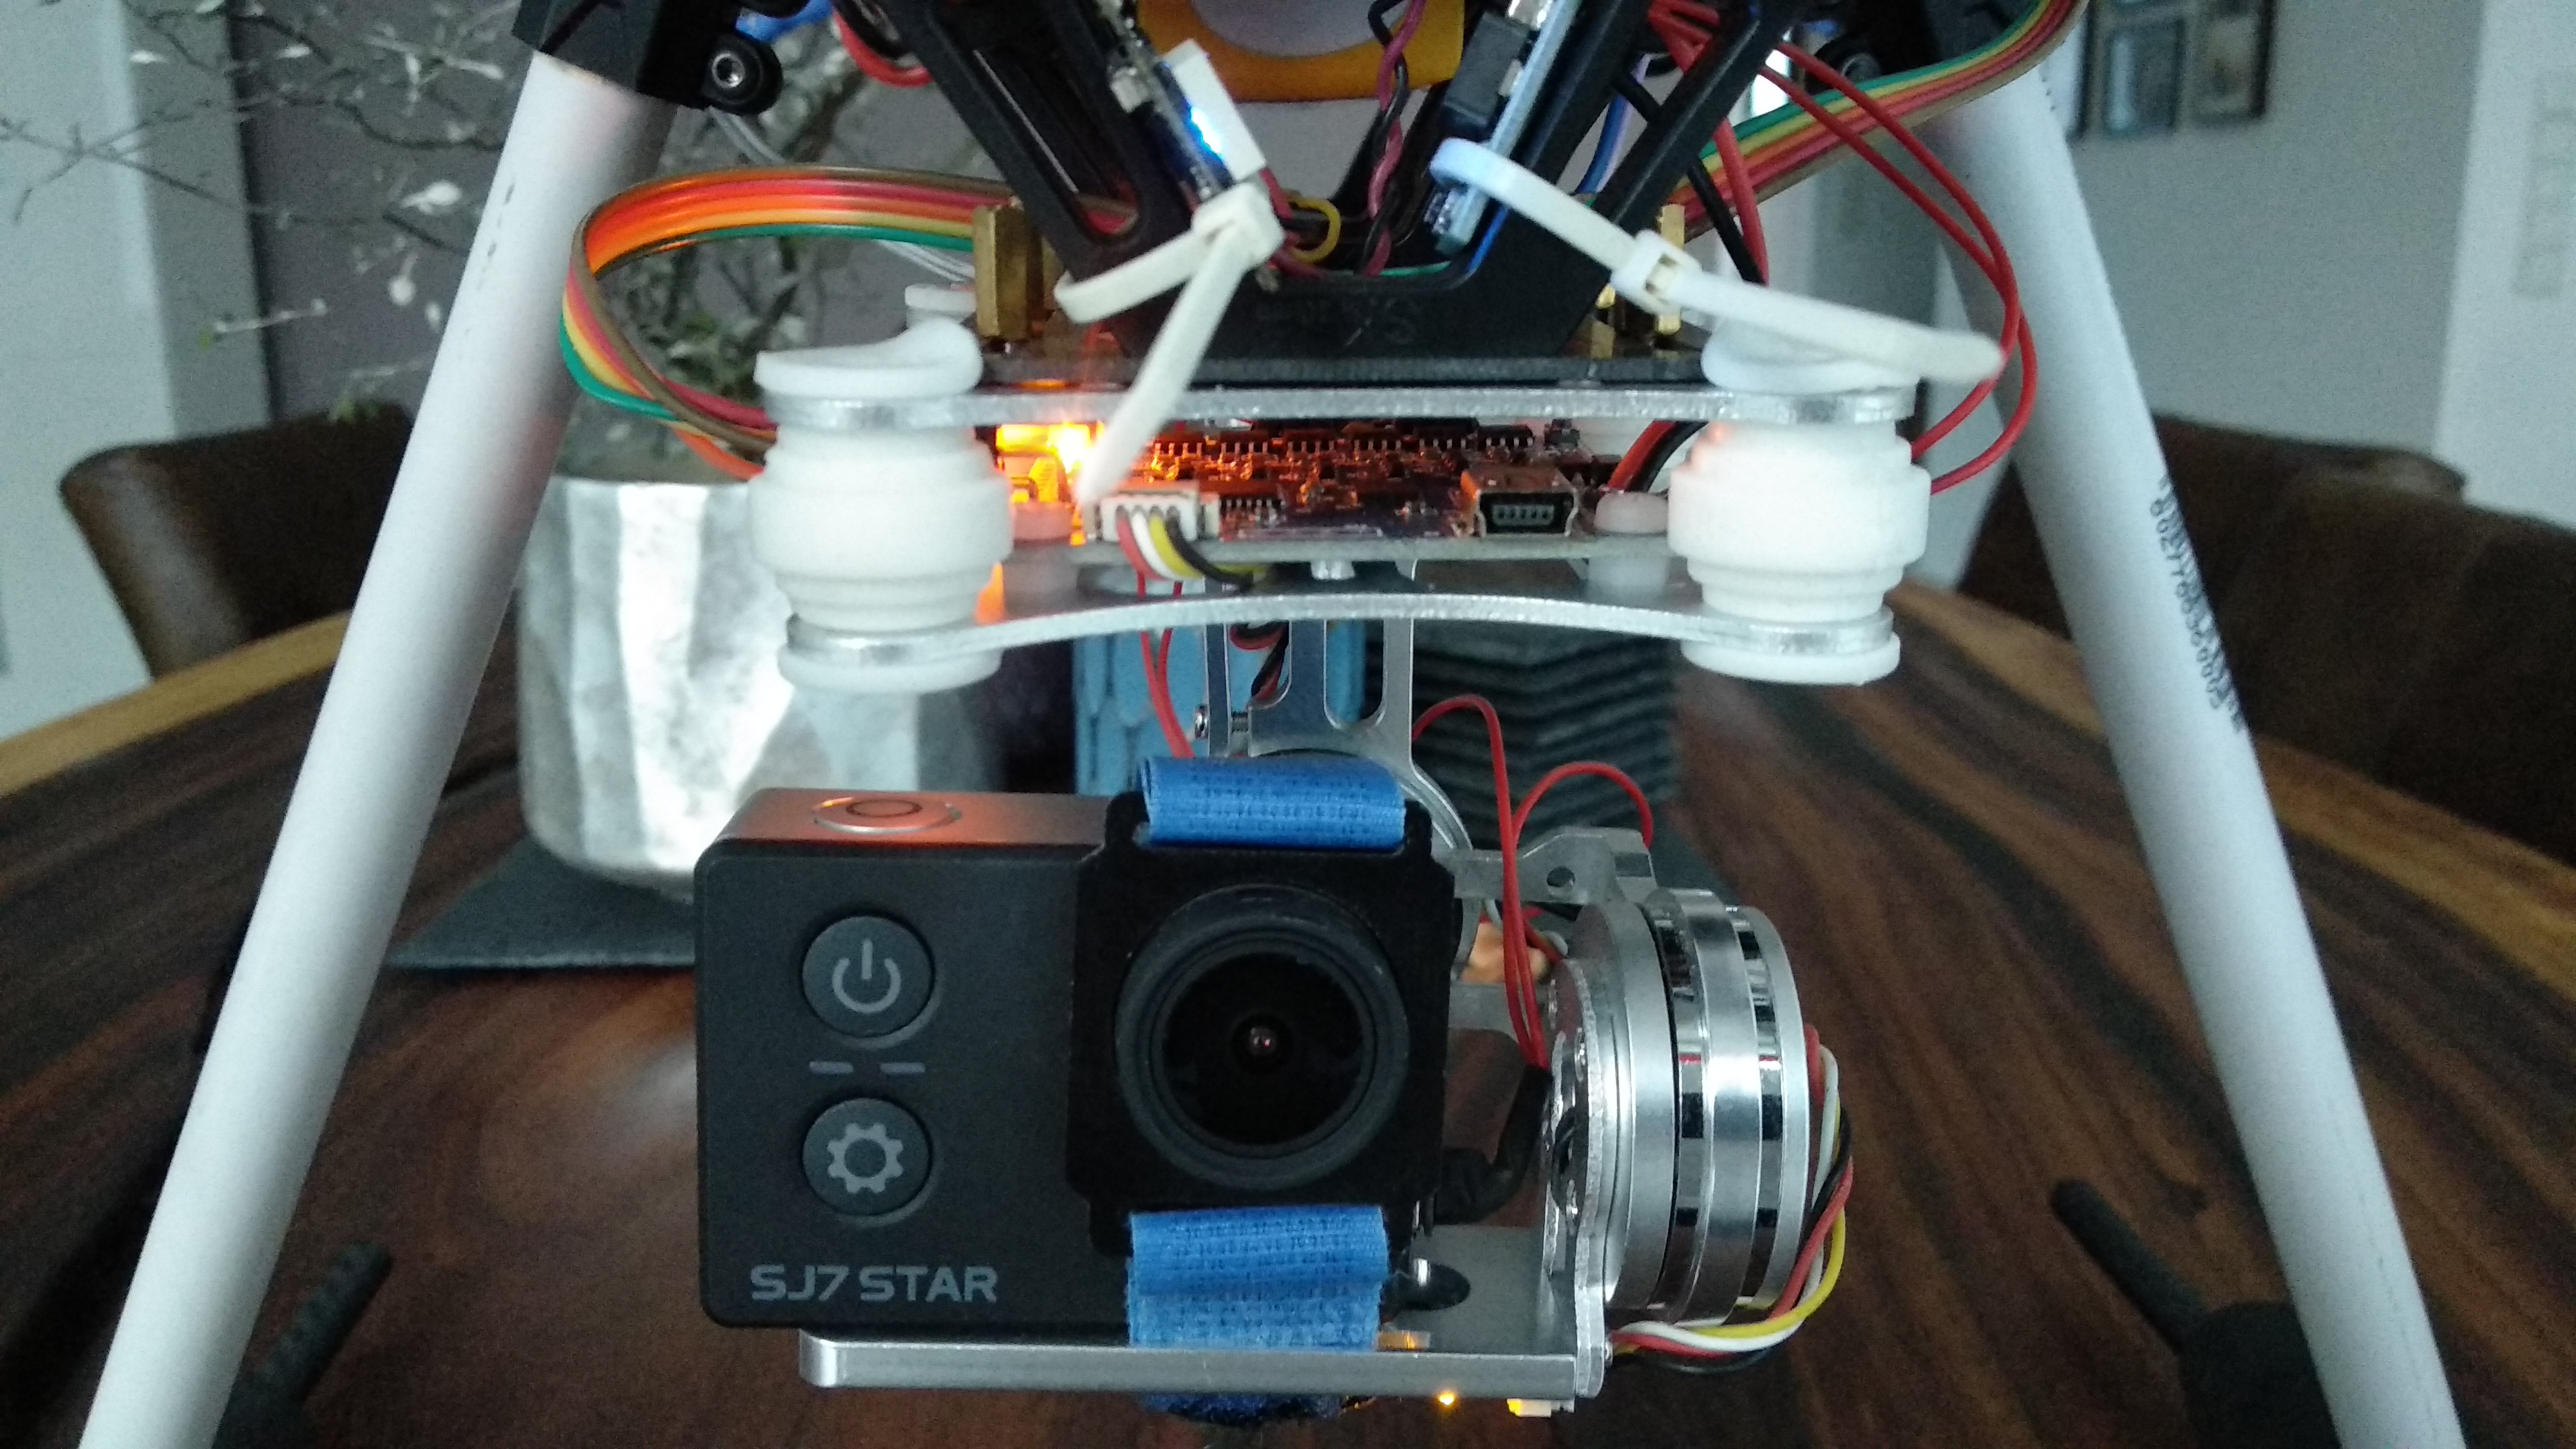
Gimbal montieren
Aus meiner Sicht war das schwierigste am gesamten Bau, die Kalibrierung des Gimbals. Ich habe mir ein einfaches Zwei Achsen Gimbal gekauft. Dieses habe ich unter den Hexacopter installiert. Die Signaleingänge konnte ich direkt mit dem Empfänger verbinden, so daß die beiden Drehpotis auf der Fernsteuerung die Richtung des Gimbals bestimmen.
Es ist wichtig vor der Kalibrierung des Gimbals die Kamera zu installieren. Nur dann kann das Gimbal sinnvoll eingestellt werden. Sollte das Gimbal mit Kamera um ausgeschalteten Zustand nicht einigermaßen austariert sein, ist es sinnvoll dies mit kleinen Gewichten zu adjustieren.
Zum Anschluß des Gimbals habe ich einen eigenen Post erstellt.
Lipo Akku
Beim Akku sind auf einige Parameter zu achten. Zunächst ist für diesen Hexacopter die Untergrenze bei rund 2200mAh, wenn man mindestens 6 bis 7 Minuten fliegen will. Man kann auch deutlich größere Akkus einbauen, sollte aber auf das maximale Gesamtgewicht von 2kg achten. Mein Hexacopter wiegt mit Gimbal, Kamera aber ohne Akku rund 1484g, d.h. da ist noch einiges an Platz nach oben.
Der andere Parameter ist der Entladestrom, der auf den Akkus zB als 30C angegeben ist. Der Entladestrom ergibt sich aus Kapazität mal C, d.h. zB 2.2A * 30C = 66A. Bei rund 10 Minuten Flugzeit und einem Akku von 2200mAh fließen 22A. Im Schnitt sind es aber eher 30A und bei kräfiten Schub auch mal darüber.
Der dritte Parameter ist das Gewicht und die Größe. Der unten angegebene Akku passt exakt in den „Laderaum“ des Kopters. Man kann natürlich auf den Akku oben oder darunter fixieren. Das verändert allerdings den Schwerpunkt.
Ladegerät
Ein gutes Ladegerät welches die Zellen auch ausbalancieren kann, ist iMax. Wichtig ist ist die Überwachung der einzelnen Zellen beim Laden. Daneben hat das Ladegerät auch eine Funktion zum Lagern der Akkus und Entladen.
Konfiguration der Naze32 mit Cleanflight
Zu der Konfiguration der Naze32 mit Cleanflight habe ich einen separaten Artikel geschrieben inklusive einem Video.
Junfernflug
Bevor der Jungfernflug gestartet werden kann, sollte man an eine in Deutschland notwendige Versicherung denken, die es für wenig Geld gibt. Es sollten auch unbedingt die Propeller ausbalanciert werden. Das erhöht die Laufruhe des Hexacopters und erhöht die Videoqualität.
Mein erster Flug ging bis zu einem gewissen Punkt gut. Mir war nicht klar, daß der Hexacopter an Höhe verliert, wenn ich stark in eine Richtung fliege, da der Schub dann nicht nur nach hinten sondern auch nach unten geht. Absolut logisch, aber an so was denkt man vielleicht nicht. Inzwischen fliege ich aber auch bei starkem Wind sehr gut.
Bevor man fliegt, sollte man den Angle Modus wählen. Dieser Modus balanciert den Hexacopter aus, wenn man keine Steuerbefehle gibt. Im Acro Modus muss man alles selbst übernehmen.
Daneben gibt es dem Modus „armed“ und „unarmed“. Im armed Modus ist der Kopter bereit zum Abflug, im unarmed Modus werden die Motoren nicht angesteuert.
English Version
How do I build a drohne?
- Order material like frame, motors, flight controller, remote control
- Solder frame to ESCs and assemble arms
- Attach motors, flight controller, receiver
- Solder and connect everything
- Set flight controller and calibrate ESCs
- Calibrate Gimbal
My experience
A few months ago I built a very powerful hexacopter myself. In this manual I would like to share my experience. In principle, anyone with some experience in handicrafts and soldering can realize this project.
I used a DJI S550 Frame (alternatively DJI F550), Naze32, FlySky FSi 6 remote control and 1000 KV motors. With a camera like SJ7 Star and a transmitter I can transmit a live picture. Total costs (without camera) are about 200 EUR, weight with camera and gimbal excl. battery is 1484g.
Shall I build a Quadcopter, Hexacopter or Racer?
A racer is rather for fun, whereby Quadcopter and Hexacopter are very well suitable for filming. A Hexacopter has better and quieter flight characteristics than a Quadcopter. Basically it depends on the use case for your drone.
Used Material
S550 Hexacopter Frame
FlySky FSi6 Fernsteuerung
Naze32 Flight Controller
6x 1000 KV Motor
6x 30A ESC Simonk
XT60 Stecker
Silikon Kabel 14 AWG
LiPo Akku 2200mAh 3S
1045 Propeller
iMax B6 Ladegerät
LiPo Checker
Gimbal (optional)
Eachine 25 mW FPV Video Sender (optional)
Eachine Video Empfänger (optional)
Which frame?
I bought a DJI S550. Alternatively you can buy a DJI F550, which has a different landing gear than the latter. Otherwise the frame is very stable and survives a crash, if necessary breaks the landing gear or even an arm.
Flight Controller and Firmware?
The flight controller calculates the motor control from the current position and the commands of the receiver. I chose a Naze32 flight controller that supports first person view (FPV), a black box, GPS, LEDs and other features. On this flight controller different firmwares can be flashed. I chose Cleanflight, whereby I only compiled those features on Linux that I need.
Cleanflight is available as an addon for the Chrome Browser, which can also be used to flash the firmware to the Naze32. But first you have to install a driver. Then simply select the Cleanflight addon in the Chrome Browser and download the corresponding firmware. Depending on the version of the firmware, features will be added or will be omitted. If you want to compile a custom version, you can download it under github cleanflight and comment out or compile the corresponding features.
Solder Motors and ESCs
The motors are controlled by so-called ESCs (electronic speed control), which communicate with the flight controller. They can also measure the speed of rotation of the motor and thus compare the setpoint of the flight controller with the actual value and make adjustments.
It is best to first solder the ESCs to the main board and then screw the arms to the main board. The motors are then attached to the arms and shrink tubing is attached to the connections to the motor. The ESCs have three connections to the motor, a control signal and plus and minus. To know how to connect, one can select in clean flight the appropriate hexacopter. A small sketch appears with the running directions of the motors. Two adjacent motors each have opposite running directions.
To find out which direction the motor is running in, you can connect an ESC directly to the receiver and test the direction in which the motor is turning. The direction of rotation and wiring can be remembered. So you know which direction of rotation fits which wiring. If you want to reverse the direction of rotation, you simply swap plus and minus.
Calibration of the ESCs
Now you can calibrate the ESCs. In clean flight you can calibrate each ESC individually. Go to the tab Motor and select the ESC or the motor. The motor is set to the maximum in cleanflight (without rotor) and then the ESC is connected. If the ESC beeps then the controller is taken to zero. After that the power supply of the ESC can be taken away and the next motor can be moved in the same way.
FlySky FSi 6 Remote Control
I use PPM for the transmission of the signal. This reduces the number of cables between receiver and flight controller to three (V+, GND, PPM) and gives me the freedom to connect the gimbal to the remote control. The receiver must be connected to the remote control via the Connect button. You can install a different firmware on the remote control, then it has a few more functions. If you are interested, mail me.
Gimbal
From my point of view the most difficult part of the whole construction was the calibration of the gimbal. I bought a simple two axis gimbal. I installed it under the hexacopter. I could connect the signal inputs directly with the receiver, so that the two rotary potentiometers on the remote control determine the direction of the gimbal.
It is important to install the camera before calibrating the gimbal. Only then the gimbal can be adjusted sensibly. If the gimbal with the camera is not balanced to some extent when it is switched off, it makes sense to adjust it with small weights.
To connect the gimbal I created an specific article.
Lipo battery
Some parameters have to be observed for the battery. First of all the lower limit for this hexacopter is 2200mAh, if you want to fly at least 6 to 7 minutes. You can also install much larger batteries, but you should pay attention to the maximum total weight of 2kg. My Hexacopter weighs about 1484g with gimbal, camera but without battery, i.e. there is still some space up there.
The other parameter is the discharge current, which is indicated as 30C on the batteries. The discharge current results from the capacity times C, i.e. 2.2A * 30C = 66A. At about 10 minutes flight time and a battery of 2200mAh 22A flow. But on average it’s more like 30A and with strong thrust it’s even higher.
The third parameter is weight and size. The battery below fits exactly into the copter’s „loading space“. Of course you can fix the battery on top or underneath. However, this changes the center of gravity.
Charger
A good charger which can also balance the cells is iMax B6. It is important to monitor the individual cells during charging. The charger also has a function for storing the batteries and discharging them.
Naze32 configuration with cleanflight
Regarding the configuration of the Naze32 with Cleanflight I wrote a separate post including a video.
First Flight
Before the maiden flight can be started, one should think of an insurance necessary in Germany, which gives it for little money. You should also balance the propellers. This increases the running smoothness of the hexacopter and increases the video quality.
My first flight went well up to a certain point. It was not clear to me that the hexacopter loses height when I fly strongly in one direction, because the thrust does not only go backwards but also downwards. Absolutely logical, but you might not think of something like that. In the meantime I fly very well even in strong winds.
Before you fly, you should choose the Angle mode. This mode balances the hexacopter if you don’t give any control commands. In Acro mode you have to do everything yourself.
Besides there is the mode „armed“ and „unarmed“. In armed mode the copter is ready to take off, in unarmed mode the motors are not controlled.
